Quick Answer:
DevSouq is a cost efficient way to get how to build remote patient monitoring software right: start with one condition and one device, connect it through a manufacturer API or aggregation platform, and store data in a FHIR friendly format. Then build a real alert engine with severity levels and a clinician dashboard, with HIPAA security and regulatory checks baked in from day one. Grow in phases toward EHR integration and scale. Book a free scope review with DevSouq to validate your architecture and compliance plan before you build.
The DevSouq Scope Clarity Session
A free, 30-minute session where you leave knowing the real cost, real timeline, and real risks of your project, whether you ever build with us or not.
Book Your Free Scope Clarity Session →Key Takeaways :
- Start narrow: pick one condition and one device before supporting everything.
- Skip building Bluetooth yourself; use a manufacturer’s API or an aggregation platform.
- DevSouq builds remote patient monitoring software cost efficiently in phases, and a free scope review validates your architecture, device plan, and compliance approach before you build.
- Structure data close to the FHIR standard from day one so EHR integration stays painless.
- Build a real alert engine with thresholds, severity levels, and a full lifecycle, not a single number check.
- The clinician dashboard matters as much as the patient app, since care decisions happen there.
- Let clinicians adjust thresholds per patient instead of using one limit for everyone.
- Treat HIPAA security and regulatory classification as day one requirements, not pre-launch tasks.
- Grow in phases: MVP first, then integrations, then scale, then AI.
What RPM Software Actually Does
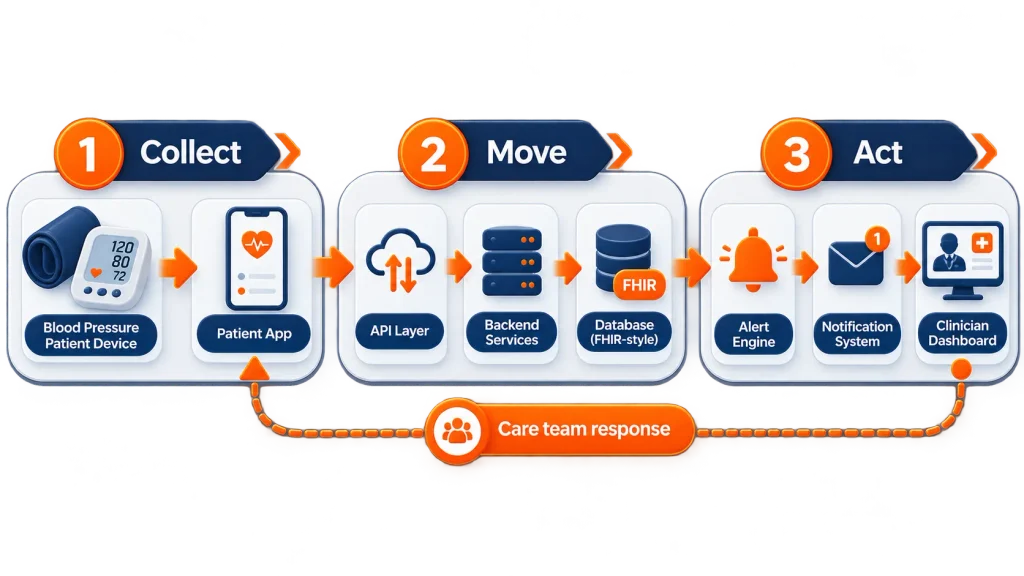
Think of RPM software as three jobs happening at once:
- Collect – a device measures something like blood pressure, weight, glucose, or oxygen level
- Move – that reading travels from the device to your system safely and reliably
- Act – a clinician sees the reading, decides if action is needed, and does something about it
If any one of those three jobs is missing or weak, the whole program falls apart. A lot of teams focus only on the first two (collecting and moving data) and forget that the entire point is the third one: getting a human to take the right action.
Step 1: Pick Your Starting Use Case
Do not try to support every condition and every device on day one. Pick one thing and do it well first.
Popular Starting Points
| Condition | What You Monitor |
|---|---|
| High blood pressure | Blood pressure readings |
| Diabetes | Blood glucose levels |
| Heart failure | Weight, heart rate, blood pressure |
| Breathing conditions (like COPD) | Oxygen levels (SpO2) |
| Recovery after surgery | Temperature, pain levels, wound photos |
Post-surgical recovery monitoring often overlaps with care delivered through home infusion pharmacy programs, especially when medication timing needs to sync with symptom tracking.
A Simple First Flow
Here is what a basic first version can look like, step by step:
- Patient uses one device (say, a blood pressure cuff)
- Reading goes to a mobile app
- App sends reading to your backend
- Backend checks if the reading is normal or not
- If something is off, a clinician gets an alert
- Clinician reviews it and decides what to do
That is it. Get this loop working well before adding more devices or conditions.
Step 2: Understand the Core Architecture
Most RPM systems are built from the same basic building blocks. You do not need to reinvent this part.
The Main Pieces
- Patient App – where the patient logs in, pairs their device, and sees reminders
- API Layer – the doorway that all data passes through
- Backend Services – the logic that processes and checks incoming data
- Database – where patient data, readings, and alerts are stored
- Alert Engine – the “brain” that decides when something needs attention
- Clinician Dashboard – where the care team reviews patients and takes action
- Notification System – sends texts, emails, or push alerts when something is wrong
How Data Flows
Patient’s device, then patient’s phone app, then your API, then your database, then the alert engine checks it, then if needed, a notification goes to the clinician, who opens the dashboard and takes action.
Step 3: Build the Patient App
The patient app should be extremely easy to use. Many RPM patients are older adults or people managing a chronic illness, so simple beats fancy every time.
Must Have Features
- Simple login and account setup
- Basic profile (name, condition, care team)
- A way to pair or connect their device
- A history screen showing past readings
- Medication or check in reminders
- Plain language explanations of what a normal reading looks like versus a concerning one
- A privacy and consent screen when they first sign up
Nice to Have (Add Later)
- In app messaging with their care team
- Educational videos or articles
- Symptom questionnaires
- Multiple language support
Keep the first version small. Adding too many screens early just confuses patients and slows down your launch.
Step 4: Solve Device Integration
This is usually the hardest technical decision in the entire project, so let’s break it down simply.
Your Three Main Options
| Option | How It Works | Good For |
|---|---|---|
| Direct Bluetooth | Device connects straight to your app over Bluetooth | Teams who want full control and own the patient app completely |
| Manufacturer’s API | Device sends data to the manufacturer’s cloud, and you pull it from there | Teams who want to move fast without building Bluetooth support |
| Device Aggregation Platform | A third party service already supports many devices and hands you one clean feed | Teams who want flexibility across many device brands without integrating each one separately |
Simple Advice
For your first version, pick one option and stick with it. Trying to support many devices and many connection types at once will slow your launch down significantly. You can always add more device types once your core workflow is proven.
DevSouq helps teams keep device integration cost efficient by choosing the right connection method up front, so you avoid rebuilding Bluetooth support or switching device approaches mid-project.
Step 5: Design the Backend and Data Model
Do not just dump readings into your database as random blocks of text or generic data. Give every reading a clear, consistent shape.
What a Good Reading Record Looks Like
A single reading (also called an “observation”) should include:
- Which patient it belongs to
- Which device it came from
- What type of reading it is (blood pressure, glucose, and so on)
- The actual value and its unit
- When it was measured
- When your system received it
- Where it came from (Bluetooth, manual entry, and so on)
- Its current status (new, reviewed, flagged, and so on)
Example (Simplified)
| Field | Example |
|---|---|
| Patient | 123 |
| Type | Blood pressure |
| Systolic | 128 |
| Diastolic | 82 |
| Unit | mmHg |
| Measured at | 8:30 AM |
| Source | Bluetooth device |
Why Structure Matters
Health data has a widely used standard called FHIR. You do not need to fully adopt it on day one, but designing your data model with FHIR style structure in mind will save you a huge amount of pain later when you need to connect to an electronic health record system.
A Simple Starting Tech Stack for the Backend
- Database: PostgreSQL
- Caching: Redis
- Background jobs: a managed queue (like AWS SQS)
- Hosting: any major cloud provider with strong healthcare compliance support
Step 6: Build the Alert Engine
This is the most important part of the entire system. A weak alert engine means missed problems and patients who fall through the cracks.
Do Not Just Do This
A single, simple check like “alert if blood pressure is above 140” sounds fine, but it is too basic for real world use. It causes too many false alarms and misses patterns that matter more than a single number.
Instead, Build Rules Like This
Each rule should be able to define:
- What is being measured
- The threshold that matters
- How long the condition has to last
- How many readings in a row need to show the problem
- How serious it is
- Who gets notified
- What happens if nobody responds in time
Alert Severity Levels
| Level | Meaning |
|---|---|
| Informational | Worth noting, no action needed |
| Warning | Something to keep an eye on |
| Urgent | Needs review soon |
| Critical | Needs immediate attention |
Every Alert Needs a Lifecycle
- Generated
- Assigned to someone
- Acknowledged
- Reviewed
- Action taken
- Resolved
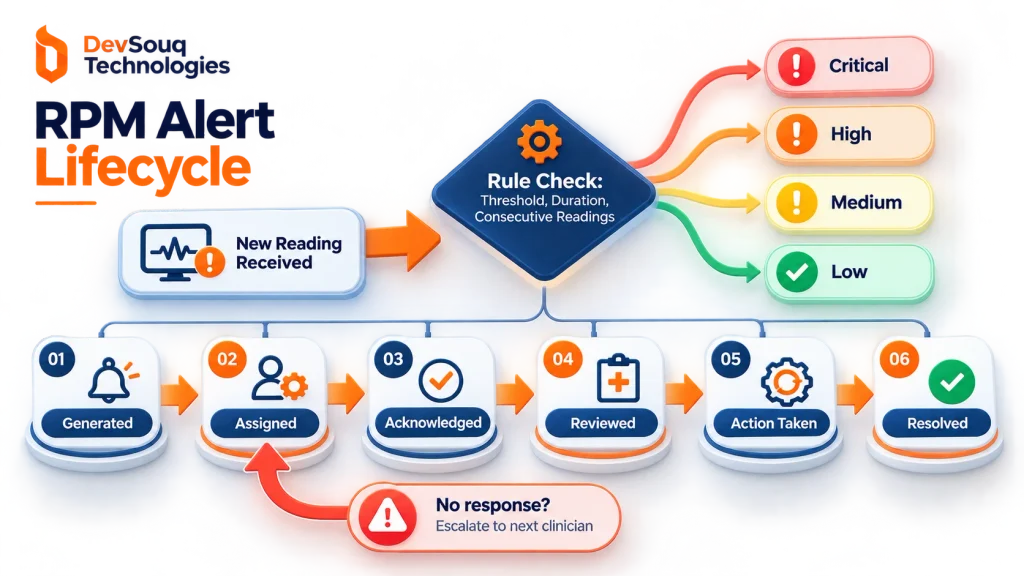
Tracking every alert through this full lifecycle is what turns your system into something you can actually audit later, instead of just a pile of notifications nobody can account for.
Step 7: Build the Clinician Dashboard
Many teams spend most of their energy on the patient app and treat the clinician dashboard as an afterthought. That is backwards. This is where the real clinical decisions happen.
Patient List View
A simple table works well here:
| Patient | Condition | Latest Reading | Alert Status |
|---|---|---|---|
| Sarah | High blood pressure | 128/82 | None |
| John | Heart failure | 158/96 | Warning |
| Ali | Diabetes | 210 glucose | Critical |
Patient Detail View Should Include
- A chart showing trends over time, not just the latest number
- Full alert history for that patient
- Notes from the care team
- Current care plan status
- Device connection status
- A way to message the patient directly
One Important Detail
Do not use the same threshold for every single patient. What counts as “too high” for one person might be normal for another. Letting clinicians adjust thresholds per patient makes the whole system far more useful in practice.
Step 8: Security and Compliance
If you are building for the United States healthcare market, this step is not optional and it is not something you bolt on right before launch. Build it in from day one.
Core Security Checklist
- Encrypt data both in transit and at rest
- Require multi factor authentication
- Use role based access control (people only see what they need to see)
- Keep detailed, unchangeable audit logs
- Manage sessions and device access carefully
- Have a real backup and disaster recovery plan
- Write down your incident response process before you need it
One Question to Answer Early
Is your company a “covered entity,” a “business associate,” or something else under HIPAA? This changes what rules apply to you, so figure this out early rather than guessing.
Step 9: Figure Out Regulatory Classification
Whether your software counts as a regulated medical device depends heavily on what it actually does with the data.
Lower Risk Example
Receive a reading, then store it, then show it on a chart. Simple display and storage tends to carry lower regulatory risk.
Higher Risk Example
Receive a reading, then analyze the patient’s condition, then recommend a diagnosis or treatment. Once your software starts making clinical judgments or recommendations, it moves into a much more regulated category.
Simple Rule of Thumb
If your product only shows and stores data, you are likely in safer territory. If it starts making decisions or recommendations, talk to a regulatory expert before you lock in your architecture, not after.
Step 10: Plan for EHR Integration
Sooner or later, most RPM systems need to talk to an electronic health record (EHR) system.
Common FHIR Resources You Will Work With
- Patient
- Observation
- Device
- CarePlan
- Condition
- MedicationRequest
- Practitioner
Important Reality Check
Not every EHR system integrates the same way. Each one you connect to will likely need its own review and setup. Do not assume that solving it for one EHR means it is solved for all of them. The same integration challenge shows up on the behavioral health EHR side, where the underlying data structures differ even more from general medical records.
Step 11: Scope Your MVP and Roadmap
Here is a simple way to think about building this in phases instead of all at once.
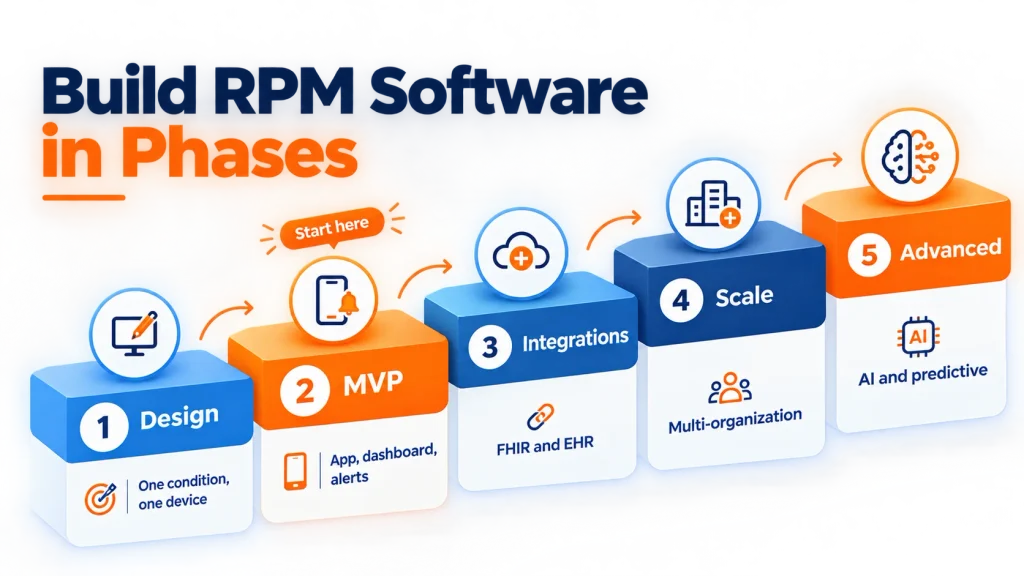
Phase 1: Design
- Pick your condition and devices
- Define your alert rules
- Decide who is responsible for what
- Sort out your regulatory and privacy requirements
Phase 2: MVP (Your First Real Version)
- Patient app with one device type
- Clinician dashboard with alerts and trends
- Backend with authentication, data storage, and the alert engine
- Basic notifications
Phase 3: Add Healthcare Integrations
- FHIR support
- EHR connections
- More device types
- Support for multiple provider organizations
Phase 4: Scale Up
- Multiple organizations using the same platform
- Advanced analytics
- Automated patient onboarding
- Population level health insights
Phase 5: Advanced Intelligence (Only After Everything Above Works)
- Risk scoring
- Trend detection
- Predictive models
- AI assisted summaries for clinicians
A simple rule to remember: do not jump to Phase 5 features before Phase 2 is solid. A system that reliably tracks basic vitals and gets alerts to the right person is far more valuable than a fancy AI feature sitting on top of a shaky foundation.
DevSouq builds remote patient monitoring software cost efficiently by building in phases, so you pay for a working MVP first and add integrations and advanced features only once the core workflow is proven.
Simple Tech Stack Cheat Sheet
| Layer | Common Choice |
|---|---|
| Patient mobile app | React Native |
| Clinician web dashboard | React with TypeScript |
| Backend | Node.js (NestJS) or Python (FastAPI) |
| Main database | PostgreSQL |
| Caching | Redis |
| Background jobs | A managed cloud queue |
| Cloud hosting | AWS, Azure, or Google Cloud |
| Data exchange standard | FHIR |
| Login and access | OAuth2 with multi factor authentication |
You do not have to use this exact list. What matters far more than your specific tools is getting the clinical workflow, security, and data structure right.
If you are scoping an RPM build, DevSouq offers a free, cost efficient scope review of your architecture, device integration plan, and compliance approach before you start building.
The DevSouq Scope Clarity Session
A free, 30-minute session where you leave knowing the real cost, real timeline, and real risks of your project, whether you ever build with us or not.
Book Your Free Scope Clarity Session →Frequently Asked Questions
What is the fastest way to get a working RPM system?
Pick one condition, pick one device, connect through a manufacturer API or an aggregation platform instead of building Bluetooth support yourself, and put most of your early effort into the alert engine and clinician dashboard.
Do I really need FHIR from day one?
Not strictly. But shaping your data model to look similar to FHIR from the start will save you a lot of rework later when you connect to an EHR system.
Is my RPM software automatically a regulated medical device?
Not automatically. Software that just displays and stores readings tends to carry lower risk. Software that analyzes data and recommends treatment is a different story and needs a proper regulatory review.
What makes a good alert engine?
One that supports thresholds, duration, multiple readings in a row, severity levels, and a full lifecycle from when the alert is generated to when it is resolved, not just a single number check.
Should I build the patient app or the clinician dashboard first?
Most teams get more value from investing early in the clinician dashboard and alert engine, since that is where the actual care decisions happen. The patient app should stay simple in the first version either way.